
I … may have mentioned no-knead bread once or twice before. My method has roots in the NYT/The Minimalist recipe, but I’ve eliminated several steps over time, and am still happy with the results.
This recipe is wonderful for people short on time or spoons. It is a high-water, low-yeast, long-rise recipe where time does the work of developing the gluten, instead of your hands and muscles. You do need a good cooking vessel and the strength to lift it in and out of the oven, but otherwise the ingredient, equipment, and activity needs are fairly minimal. My breadmaker languishes in the cupboard these days, only dragged out if we want bread the same day, or to make jam.
The texture is lovely – a little bit sourdough, a little bit Italian, a little bit ciabatta. You can adjust the texture and taste in a few ways – this is what I’ve settled on as my basic recipe, but do please play with it. I’ve never made an effort to do this with any non-wheat flours, and I feel that this particular recipe is pretty much dependent on gluten, but others have tried – and tried, and tried – and some have made edible things.
People keep asking how I make it, but as I don’t measure particularly much and it’s all done by feel and experience now, I tend to wave my hands pointlessly in the air and generally fail at getting across how exactly I make this stuff. So here’s a photo tutorial!
Very image heavy below the cut. I’m sorry, I haven’t alt-tagged and title-tagged all the gazillion photos, but I do describe the action in the post text.
Ingredients And Equipment
You will need:
* About three cups of flour. I use one-third wholemeal flour, two-thirds organic baker’s flour (high gluten). I have made this before with regular plain flour, and it still works fine. Add more wholemeal if you like, but you’ll find your rise is much less enthusiastic.
* About two teaspoons of salt.
* About two cups of water.
* About a third to a half a teaspoon of instant yeast.
* A large bowl.
* A mixing spoon.
* A lidded cooking vessel that can take a very high heat.
* Oven gauntlets.
* A clean tea towel.
Optional ingredients include: seeds (poppy, sesame, caraway, sunflower, nigella, whatever else you like), orange juice, olive oil, herbs, nuts, etc. Also handy: A dough scraper (but you can use a spoon if you really want to).

I use these gorgeous gauntlets. They are very heavy duty, and have silicone grips for extra grippiness and extra heat resistance. This pot will be HOT. And heavy.

This is my bread pot. It’s an oval Le Creuset dutch oven. Be sure to cover the handle liberally with aluminium foil; if you don’t, it will smoke and burn and smell really, really bad. Other people have used lidded Pyrex (risky? some say yes, some say no), various heatproof lidded ceramic pots, and so on. I can’t emphasis this too much: your oven will be HOT. Make sure your cooking vessel can take it. You also want something with a good thermal mass, not a thin metal pan. I recommend cast iron, either enamelled or not.

Making the dough
First step! Measure out your flour. I use whatever coffee cup comes to hand, and I throw in around one cup of wholemeal flour, and two cups of white. I don’t shake or level or anything else fancy, I just scoop and throw. You’ll adjust the texture in the water step.
Make sure your bowl is quite a bit bigger than your mix. You will get a lot of rising later, maybe double or triple the size of the stuff. Or sometimes more.

Yeast. About a third of a teaspoon for a long rise (overnight); you can speed up the rise a bit by adding more yeast and mixing with warm water, but you will sacrifice texture and taste if you do this. I use a table teaspoon, not a measuring spoon.

Salt! Two heaped teaspoons. Yes, it needs salt. I left it out once and BLEAGH. Also, the salt helps preserve the bread. You can get all fancy and use expensive salt if you want. I don’t bother.

Mix up those dry ingredients. You can add some poppy seeds or other bits ‘n’ pieces now.

Now for the wet stuff. You can optionally add around a capful or two of orange juice, to make the yeasties extra happy. Don’t worry about it if you don’t have this handy.

You can also add olive oil. I do around 20-30 seconds of this dribbler, which I think is something like a tablespoon or a dessertspoon or something in this order of magnitude. It’s no big deal if you leave this out, but don’t leave out the salt. Really.

Top that cup up with tap water. Chuck it in.

Grab another cup of tap water, but don’t put all of this in. Put maybe a half, or mmmaybe two thirds, depending on how heapy you did the flour cups back at the start.

Mix it on up! This is the part that I find hard to explain. You need to adjust that water amount to get the texture right. It should be wet, too wet to tip out and knead, but not as wet as cake batter. It shouldn’t look sort of dusty-floury. lThere still should be quite a bit of resistance to stirring, not just la-la-la-stir-stir-stir like you do when making a cake. If you can scoop up a spoonful and it drops off the spoon really easily, like this, it’s too wet.

When it’s right, it will strand a lot when you try to lift up a spoonful, like this. It will reluctantly drop off the spoon, but strandily.
So go on adjusting that water level (you may sometimes need to shake in a little more flour), until it’s just right. You will get a feel for this over time.

Letting it rise
Grab a clean tea towel, wet it thoroughly, squeeze it out (don’t wring), and drape that over the bowl. Some people cover with a lid or plastic wrap, but I wasn’t happy with the results when I did that. I prefer this method.
Go ahead and leave this bowl somewhere non freezing overnight. How long? How long is a piece of string? I usually mix it up in the evening, and cook it around the middle of the day or in the afternoon the next day. I’ve left it 14 hours before; I’ve left it 24. Longer rises can have less yeast and a cooler spot; shorter rises want a little more yeast and a warmer spot, and if you’re in a big hurry, use tepidly warmish water to mix it up, instead of taking it from the cold tap.
If it hasn’t risen to your satisfaction, you can pop it in an oven with only the light on for a while, or set it on a heat pad or heated wheat bag.

Here’s one I prepared earlier!
It isn’t the hugest rise ever, but it’s just fine. I can see lots of little bubbles over the surface, which haven’t shown up well in the picture. Sometimes you’ll see some big bubbles making themselves known. I’m confident this is going to be good – there’s a lovely yeasty smell.

Cooking
Here’s the inside of my pot. You can see that it’s very, very well seasoned. This pot has seen a lot of loaves of bread. I don’t use it for anything else these days, and it never sees detergent – just a wipe out after use.

If your pot isn’t well seasoned, I do recommend a spray or a smear of olive oil. Some of my earlier batches stuck, and that was all kinds of no fun at all.

Set your oven to 230-240 degrees. For the Luddites, that’s around 445-465.

Pop your pot in there – making sure any Bakelite is well covered!

And preheat the oven and pot (and lid) for about 20 minutes.

When that pot is lovely and hot, take it out carefully, and dump that dough on in. Try to get it quickly peeled out and dumped in one piece with as little stretching and separating and dropping and fiddling as you can. I use a dough scraper to scoop and place. In this picture I’ve held the bowl up to show you the stranding – all that gluten developed with no kneading! The power of microbeasties.

This is how it should look now. Don’t stand around looking at it for too long.

Put on some seeds if you like. I’ve used sesame.

Lid on, and put it in the oven for 20 minutes. This recipe is so easy, you don’t even have to re-set your timer to a different number.
At the twenty minute mark, take the lid off. I’ve taken the pot out for the photo, but usually I just reach in and grab the lid out for minimal heat loss. Salivate now. If your oven heats a little unevenly, this might also be a good time to spin the pot around 180 degrees.
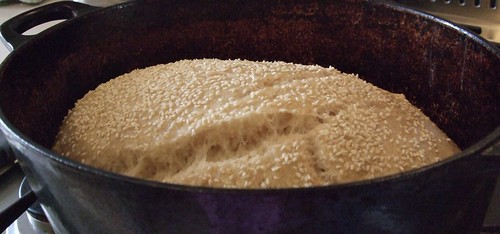
Another twenty minutes.
The Bread
This is your finished product! In the pot…

…and out of it. This is the underside.

And here it is cooling on the rack.

If you want a chewy crust and very moist crumb, you can wrap it in a tea towel at this stage. For a crustier crust, leave it out in the open. If you prefer something in between, you can wrap it for a while and then unwrap it.

Look at this baby! Do you love it?

IMPORTANT: Do not cut it until it’s cooled right down. Yes, I know how tempting it is. Just wait. It’s worth it.
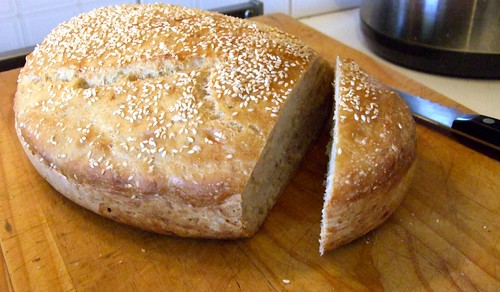

Tra-la!
Serve: However you like! Spread it with butter. Drizzle it with olive oil. Try cream cheese. Peanut butter. Pesto. Pate. Make bruschetta. Make garlic bread. When the loaf is down to the last quarter and getting a tad stale, slice the crusts off and use the interior to make stuffing for poultry (I just cut it into cubes, no fiddefaddling or toasting).
So, to recap the numbers:
– Three cups of flour, two teaspoons of salt, a third of a teaspoon of yeast (but no-one’ll care if you put in a half).
– Optional stuff: OJ, EVOO, seeds, etc.
– Leave it for 18 hours, or whatever.
– Preheat to hot for 20; cook for 20 lid on, 20 lid off.
Categories: arts & entertainment, Life
 In memoriam: Diana Rigg
  100 books by women in 2016
  Sunday Poetry: Agendas by Elaine Gallagher
  Vale David Bowie
Oh my. Thankyou for this – sounds super easy, and looks SO GOOD.
Oh wow. I hate cooking, and those pics and easy-to-follow recipe make me want to go and try it out myself.
A true public service. Thanks 🙂
Beautiful. I’m going to give that a go, soon! I may even dare to eat it with a peach.
I think I know what I want from my hubby for Mothers Day. I can practically smell that from here!
I am so going to make that.
Good grief, that looks amazing! I covet, I yearn, I pine, I perish for that bread. And I even have some yeast in the cupboard – I might be able to make that, it would be a good way to test out the dutch oven I got for my birthday!
P.S.: ex-pat Aussie here… didn’t think I’d ever get verklempt over a container of Saxa salt!
I do love it. I’m a little afraid of what changes I might have to make to it to make it work at high altitude, though. Like veryvery high altitude. I’m gonna try it and see.
Rachel in WY, if you are where I think you might be in Wyoming (i.e. next to a rather lovely infrared telescope) then I’m sure you will have willing fellow experimenters in the high altitude kitchen!
Mmm, do I dare risk it with Pyrex and a tiny combination oven/microwave?
I was inspired to make this last night, we had a warm night and I baked at breakfast, now munching from a divine loaf!! thanks for posting!
That is a perfect explanation!
Awesome! I had a great no knead free-form loaves recipe but now it seems the oven in my house is too hot and the crust always burns. Maybe my bread would be better off in a loaf-tin, using this technique. The texture looks absolutely perfect!
Yum, very inspiring, thank you. I love lazy cooking.